System Call Analysis in the Age of AI : Revolutionizing Malware Detection with our own Machine Learning Classifier — Part 3

Welcome to the last part of this Blog series. Here are the links to part 1 and part 2

100% accuracy in detecting Malware by our own Classifier

Implementing Machine Learning for Malware Detection

Now, having sifted through the wealth of system calls and identified our crucial data points, we find ourselves at an interesting juncture. The question that presents itself is — how do we use this data to detect malware? Well, it’s time to put the power of machine learning to work and create a model to achieve this task.

Let’s take a step-by-step walkthrough this process

  1. Create Training and Test Dataset: Our first step is to divide our data into a training set and a test set. This is akin to separating our data into a learning phase and a testing phase for our model.
  2. Select Random Data Points: From our training set, we randomly select a number of data points. This ensures our model’s learning isn’t biased and it can make accurate predictions with unseen data.
  3. Build a Decision Tree: Next, we build a decision tree using these selected data points. Imagine this as creating a flowchart that helps the model make decisions based on certain conditions.
  4. Choose Number of Decision Trees: We then decide on the number of decision trees that our model should have. This essentially means we’re deciding how many ‘thinking paths’ our model should consider.
  5. Repeat Steps 1 & 2: As part of refining the model, we repeat the process of creating datasets and selecting random data points.
  6. Predict and Assign Categories: Finally, for our test data points, we run them through each decision tree to get their predictions. We then assign these data points to the category that receives the most votes across all decision trees.
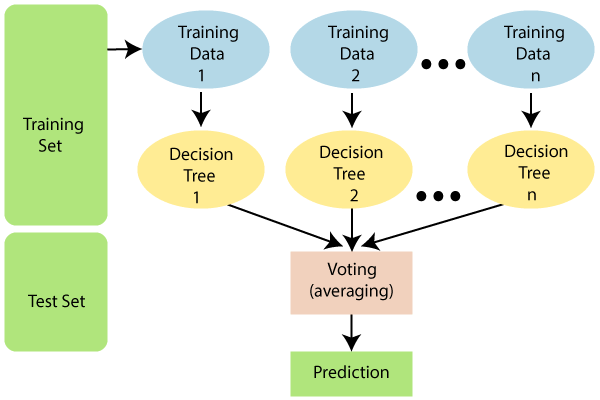
Out of 3, one sample classifier for display (Source)

Please note that we built our own classification model by combining multiple pseudocodes from different existing algorithms. Therefore, we are neither disclosing the code nor the method (Maybe in future Blog, I will share how I did it). However, the purpose here is to understand the broader approach of using machine learning in malware detection. If you can grasp this concept, you’re on the right track to understanding this fascinating field of study.

Classification, Training, and Prediction: Bringing Our Model to Life

In the realm of machine learning, training a model is key to achieving accurate predictions. Using our established datasets, we train our model on system call names, frequencies, and their association with either legitimate applications or malware.

This allows the model to identify and evaluate which system calls are crucial for accurate predictions. It can then filter and categorize applications based on these vital system calls. For example, if a particular system call only appears during the execution of malware, its occurrence can indicate a potential threat.

Once the model has been trained, it can then predict whether a file is malicious based on its test dataset results.

Let’s take a moment to review our training datasets, which you will find detailed in the following image. These datasets comprise three key elements: the application’s name, the specific system call, and the frequency at which this system call occurs. To support our understanding and categorization efforts, we have labelled them as “G” for legitimate app, and “M” for Malware. This classification will aid in differentiating the nature of system call behaviors across various application types.

Train Dataset

Below set of data are for testing purpose without categorization or labeling

Test Dataset

Streamlining System Calls

Next, our task is to identify and evaluate the essential system calls that can assure us optimal accuracy. As illustrated in the subsequent image, applications have been categorized based on the system call, with ‘0’ denoting a legitimate application and ‘1’ representing malware. For instance, the “NtClose” system call appears in both legitimate application and malware. In such cases, determining whether the application is malware, or a legitimate application purely based on the “NtClose” system call can be a challenging feat.

Shows Frequency of NtClose in Legitimate Application and Malware Application

Moving forward, let’s examine another system call, as depicted in the following image. Here, we observe that the frequency of the “NtIsUILanguageCommitted” system call is zero for legitimate applications. This indicates that legitimate system applications are not invoking the “NtIsUILanguageCommitted” system call during their execution. On the contrary, malware applications do call this particular system call.

Shows Frequency of NtIsUILanguageCommited in Legitimate Application and Malware Application

As depicted in the following figure, we see that the top two features are notably informative. These features, due to their high ranking, play a more significant role. Particularly, the two features named “NtQuerySymbolicLinkObject” and “NtIsUILanguageCommitted” have a profound influence on the model and its overall performance.

Shows Important Features of System Call

Assessing Test Data Predictions and Model Accuracy

Now that our model has been trained, it’s time to put it to the test and evaluate its predictive power. To do this, a new prediction vector was created, as illustrated below.

Shows Score and Prediction of Test Dataset

Despite one slight misstep — a malware instance was incorrectly classified as a legitimate application — our model displayed an impressive score of 1.0, indicating 100% accuracy.

System Call Analysis in the Age of AI : Revolutionizing Malware Detection with our own Machine Learning Classifier — Part 2

Welcome to the 2nd part of this Blog series. Here’s the link to Part 1.

100% accuracy in detecting Malware by our own Classifier

Capturing System Calls: The Heart of Our Methodology

Think of system call as a program’s special request to the computer’s operating system (user mode to kernel mode). To monitor and display the interaction between a process and the kernel, we can use system diagnostic tools like strace, and NtTrace.

NtTrace is like spyglass that lets us zoom in on the critical spots in Ntdll, a vital part of the Windows operating system, which allow us to set up ‘breakpoints’ around the Windows system calls — think of these as hidden surveillance cameras monitoring the kernel’s interactions.

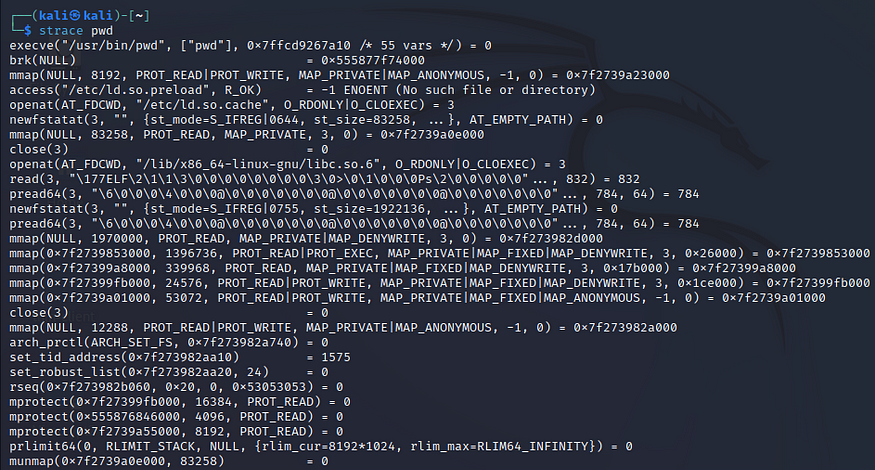
Now, what happens when these system calls activate one of our carefully placed breakpoints? That’s when our tool, playing the role of a vigilant security officer, steps in. It quickly takes note of the arguments — the specific instructions — that were passed along and returned during that interaction. here’s how it look likes when we run strace (For Linux):

This is how system calls are look like when we run a command

In this process, strace is employed to execute the common command ‘pwd’. strace’s role is to act as an interceptor and recorder for all system calls instigated by the ‘pwd’ command. Following the execution, the intercepted system calls and signals are then reported back and displayed on the console upon the command’s completion.

If we take a closer look at the diagram above, the first point to note is that each individual line in the output corresponds to one specific system call made by the command. Taking our ‘pwd’ command as an example, the initial line indicates that the ‘execve’ system call is invoked at the command’s commencement. The ‘execve’ system call is essentially the kernel’s way of launching a new program, specifically, the program that is pointed to by the first argument.

Progressing further, the diagram reveals that strace also meticulously lists the precise arguments involved in each system call. In the context of our ‘pwd’ command, the ‘execve’ system call executes the binary situated at the path ‘/usr/bin/pwd’ and submits ‘pwd’ as its principal argument.

As we delve deeper into the output, we can journey line by line to scrutinize the command’s behavior and actions at each stage. Each system call — be it ‘read’, ‘write’, ‘connect’, and so forth — tells its own unique story about the operations performed by the command.

Segregating System Calls: Preparing Data for Analysis

Upon capturing raw data for both malware and legitimate application system calls, it’s essential to segregate and store them separately for future analysis, as shown below images:

Legitimate app system calls
Malware app system calls

Dissecting System Calls: The Key to Unlock Malware Secrets

Now, let’s turn our attention to examining the structure of a system call. Think of it as opening a book to understand its content. We’ll open one of the captured files and take a peek into its anatomy.

As you will see from the image below, every system call carries a unique identity. It has a distinctive name, and it comes with a set of arguments and a return value.

Raw System Calls

Those system calls can be any of the followings as shown below image which offers us vital clues about what the system call is, what it does, and how it works. It’s like unlocking the secret language of your computer’s operating system.:

System Call Symbols
Examples of System Calls

As we venture forward in this exploration, our focus will narrow down to system call names and their corresponding sequences and frequencies. This is where machine learning enters the picture, transforming complex data into digestible insights.

To do this, I’ve harnessed the power of regular expressions, an invaluable tool in parsing textual data. It helps us sift through the plethora of system calls and identify the ones that are significant to our analysis.

Below, you can view an image that visually represents how regular expressions enable this process, simplifying the extraction of crucial information from the vast sea of system calls. Remember, despite the technicality of the process, it’s like sorting through a mixed bag of items to pick out the ones we need.

Count of each system call of one program

In the next part of this Blog, we will train our dataset and test them against our own classifier. Then we will predict the result of our work…

System Call Analysis in the Age of AI : Revolutionizing Malware Detection with our own Machine Learning Classifier — Part 1

100% accuracy in detecting Malware by our own Classifier

In the vast digital seas of our interconnected world, we continually face a storm of cybersecurity threats, notably the ever-evolving danger of malware. As these invisible threats grow more sophisticated, the need for stalwart defenses has become increasingly crucial.

Despite our most advanced antivirus software, the task of defending against this wave of malware remains an arduous and uphill battle. For professionals in cybersecurity, and particularly those working as Malware Analysts, their daily challenge is to identify, scrutinize, and understand the many forms of malware infiltrating our digital domains. This typically involves labor-intensive, manual processes using specialized tools such as IDA Pro, WinDbg, and OllyDbg, which can be time-consuming.

Faced with this relentless digital onslaught, how do we fortify our defenses and secure our virtual infrastructure? The answer lies in the extraordinary capabilities of machine learning.

Machine Learning: A Game-Changer in Malware Detection

In the intricate and unpredictable sphere of cybersecurity, numerous challenges lie in wait. However, amid these trials, one pioneering approach has emerged, showing considerable promise and potential for future applications: machine learning.

Rather than the conventional approach of painstakingly establishing a manual set of rules for malware detection, machine learning offers an intriguing alternative. This innovative methodology allows us to train a machine utilizing highly sophisticated algorithms.

In machine learning, algorithms act as decision-making guideposts. They operate by learning from previous experiences, or in this case, from pre-existing data. The machine is meticulously trained on a vast set of diverse and complex data, allowing it to learn, adapt, and make precise predictions on new, unseen data.

In the context of cybersecurity, the utility of this technique is exceptional. A machine learning-based system is capable of analyzing millions of system call characteristics in real time. The scale of this analysis far exceeds what human analysts could achieve, particularly given the speed and accuracy required.

Most notably, machine learning methods are not only confined to identifying known malware, but also they are equally proficient at determining whether a file is malicious or benign, even when encountering novel, previously unseen forms of malware.

Just as our immune system works tirelessly to identify and neutralize foreign invaders in our bodies, machine learning can act as an immune system for our digital environments, identifying and mitigating the threat of malware. Today, we’ll embark on a journey to explore the integration of machine learning and malware detection. Our primary aim is to guide anyone new to the field through this intriguing landscape.

The Essentials for performing Malware Analysis

To kick things off, it’s paramount that we equip ourselves with the right set of skills and tools needed for malware analysis. We will be relying on below libraries and languages.

  1. You must have basic knowledge and understanding of System calls and different machine learning classifier.
  2. These include NumPy for array processing.
  3. Pandas for data manipulation, and a machine learning algorithm to classify the dataset.
  4. For visualizations, we will use the Seaborn library.
  5. DataFrames for data manipulation.
  6. The project will be developed and presented in Jupyter Notebook and will utilize Vim as the text editor.
  7. To match patterns, we will be leveraging Regular Expressions, and Python will serve as our coding language.

Establishing a Safe Environment for Malware Analysis

Once above mentioned prerequires are in place, you’ll need to set up a secure testing environment for your malware. You can download and install the Linux system and Windows Virtual Machine on Oracle VM VirtualBox to run the Malware for testing purpose.

To begin with our malware analysis, it is crucial to build an isolated, controlled, and secure environment, often referred to as a ‘“lab”. In this context, “isolation” is key. The lab should be completely separated from your regular work environment to avoid any potential collateral damage. This isolation is established through a sandbox or virtual system, ensuring it employs Network Address Translation (NAT) and has no shared folders or USB connections. It’s also pivotal to keep all systems updated with the latest security patches.

Collection and Verification of Malware Samples and Legitimate Applications

Our next step involves collecting malware samples from various repositories. We understand that navigating the complex world of cyber threats requires access to tangible examples and real-world scenarios. To this end, we’ve included below images in our article that lists the various sites we utilized to download malware samples for our work.

Source of Malwares samples
Source of Virus Samples

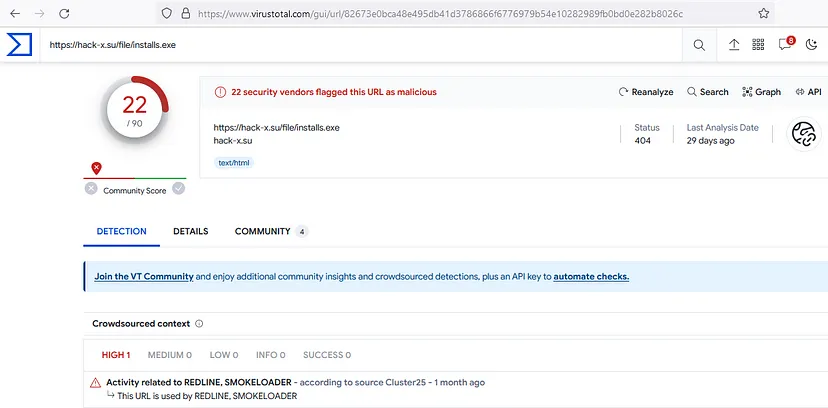
These samples serve as the fodder for our machine-learning model, allowing it to learn and adapt. To ensure that these files are indeed malware, they can be uploaded to Virus Total or similar platforms for verification as shown in the image below.

Verifying Malware samples

Regarding legitimate application samples, it can be downloaded directly from Microsoft’s official website or sourced from pre-installed Windows apps.

In the next part of this Blog, we will capture the system calls of the Malwares as well as legitimate applications, then, segregate them to train and test data set, after that, fine-tune them for our own machine learning classifier.